Alternative Screen For Doors

03.16.2016

0830

DSC_3696

Materials:

  • Fabric shower curtain
  • Shoelace
  • Metal rings
  • Binder Clips
  • Nails (thin enough to fit through the holes of the shower curtain)

Tools:

  • Hammer

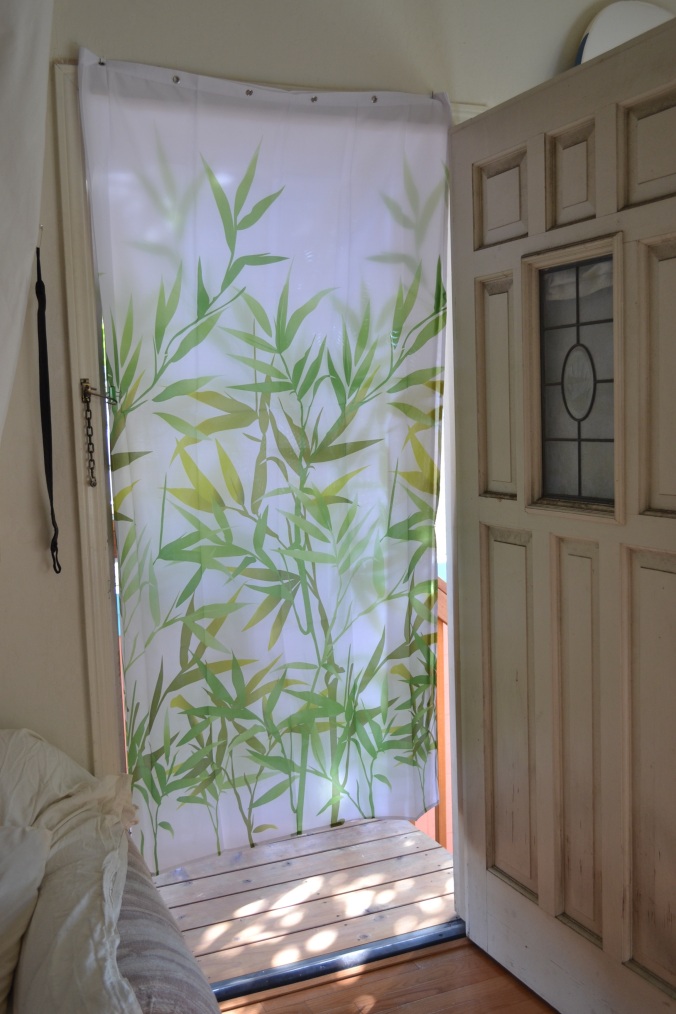
As Spring is rolling in and Summer is around the bend, I wanted to show a design hack that doesn’t require much commitment. I have a small balcony that leads up to my area and it doesn’t have a screen to keep out pesky bugs. I’m a fan of fabric shower curtains for the fact that I like to toss them into the washing machine and hang them up to dry. I have a few fabric shower curtains that I keep around for design hacks such as these.

DSC_3694DSC_3699DSC_3698

A shower curtain fits almost the height of a standard door frame. For anyone who lives in a space where they cannot impede on the design structure of the space  (ie. due to tenant contracts via landlord), this seems to ease the pain of when your area is overheating during the hotter season. I took 2 tiny nails and hung up one of my fabric shower curtains. Make sure that the nail on the end where the hinge of the door frame is located, is about 6″ from the edge of the frame. This is because when you swing the door open, you have to take in to account the width of the door itself. The curtain must hang easily and without tension as the door is open at 90 degrees. On the door handle side, try to use a binder clip to extend an arm to hook it to any lock hinge with an S hook, or you can simple place a push pin in the wall and hook the binder clip handle to it.

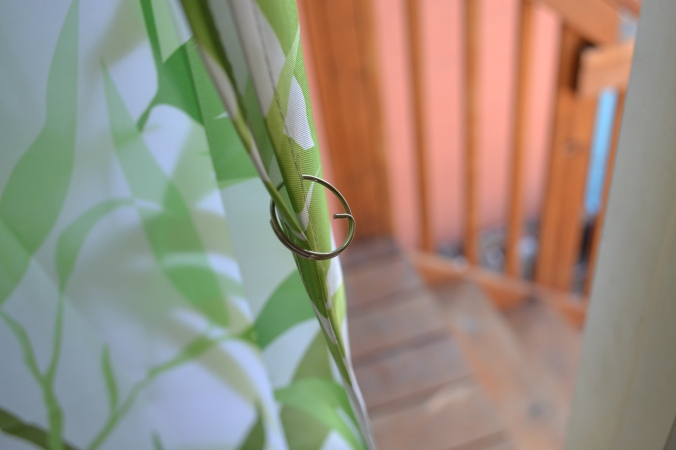
The nail holes are also a simple fix if you decide to move out and need to patch up the holes with caulking. On the open side of the shower curtain I clipped a metal binder clip and on the hinge side of the door, I looped a metal ring. The side with the metal loop tends to wedge perfectly in between the door and the frame on the hinge side. However, when placing the metal ring, try to wedge it horizontally. I actually use a folded up washcloth to wedge under the door to hold it open too.

DSC_3669DSC_3671

On the bottom of the curtain, if you want some weight to the curtain, you can simply attach some metal binder clips with a key chain on each (I know you guys have these key chains lying around somewhere). If you don’t have any key chains, try to find a small weight to hang from the binder clips. The reason why I use binder clips in this design hack, is because I don’t want to sacrifice the integrity of the shower curtain itself.

If you still want the curtain to be lower, you can take some extra shoelace/string/rope/twine and create an extension for the top like this:

DSC_4121

Because the nails are on the top of the door frame, you have about three inches to give in the distance that the curtain starts to hang. If you add these extensions on, the curtain should fit right under the door frame. But if you do add these extensions, you will need to add another nail so that the middle of the curtain isn’t loose. So it will look like this:

DSC_4123

My extensions seem to be enough for me when it comes to hanging my shower curtain and the design on the shower curtain gives a little bit of illuminated art during the day. I don’t add the binder clips or the key chains at the bottom of mine during the summer. I think I like the drastic movement it makes with the wind when it flows through my space. I hope this design hack helps for any of you who may be living in apartments or homes that get uncomfortably hot during the summer. It’s a way to make your own screen without destroying the integrity of the architecture and design or paying for a brand new screen.

Needed A Phone Holder For The Car

02.15.2016

0800

Materials:

  • Shoelace
  • Carabiner
  • Metal rings
  • Box that would fit my cell phone
  • Electrical tape (try to match the same color as the new cell phone holder)

So I made this phone holder in 2011, it was right around the time when the statistic of distracted driving started becoming an issue. Quite frankly, I don’t text and drive, I enjoy driving when I’m driving. The idea of getting pulled over for a ticket is also not one of my goals. However, I still used my GPS map when I drove to new locations. I did research different types of phone holders for cars and I wasn’t happy with any of the designs.

I like to keep surfaces clean, mostly because I hate to move things when I wipe down a surface, and then move them back. The mounting units that came with the phone holders would either have a set holder that would attach to surfaces or they were movable. There was the option of using the devices that had a suction cup to stay attached to my windshield, but if my windshield temperature got too cold, it would slowly release the suction and the entire device would fall down.

I love the Law of Gravity. I really do. I utilize it in almost everything I design or make. This was my solution to my problem.

DSC_3514DSC_3515DSC_3516

I used the black case that my 1 TB external hard drive, and used rings to hang the case from my vent system in my car. I cut a rectangular hole on the bottom so that I could attach the charging cord. I cut out a rectangular hole so that I could see the screen when I drove and I used electrical tape to clean the edges. (I use electrical tape when the environment calls for some sort of heat fluctuation.) The holder is slightly bigger than the phone, but I figured, iPhones are getting larger with each generation so why not.

I have an old car but I still love looking at this contraption. It’s just amusing to see my solutions. It’s not the prettiest iPhone holder, nor do I think it would sell, but I didn’t go out any buy anything and it still works to this day.

Reuse Items

02.01.2016

0800

I’m located in Northern California and recently we’ve had some rain. It’s good situation, in fact it’s a great situation. Our seasons have been delayed in the past decade that we’re always thankful that we can replenish our water supply when the opportunity arises.

However, this situation also brings other issues to the area such as floods, landslides and residential water damage. There are five rain gutter spouts attached to my home and one of them releases water a little too close to the exterior structure of the house. There are splash blocks that are sold to be placed beneath the downspout elbow, which helps to disperse water away from the foundation. But I also don’t like to go out to buy new items if I can make it at home.

So my solution was to take an old metal paint roll pan and cut two slits on the wide-sided end, and about six inches apart. This section cut would create the gap where the water could exit the pan. I hammered the new piece of metal down and then slipped it under the spout.

Here was my solution:

DSC_3501DSC_3499

For those of you who may have the same issue, I hope this post helps.

Less Is More

01.21.2016

0700

I bought this shirt in 2000. The shirt is from Consolidated Skateboards, a great company. I bought it because the quote sparked my interest and I’ve never been able to let it go. It’s a simple red long sleeved shirt, with only the front print that you see, and nothing on the back. I never knew how much of an impact those words would be.

DSC_3460

When people say that I’m simplifying my life, I jokingly call my system “Being Strategically Lazy”.

When I decided to start living a zero waste life and because I was eliminating so much from my life, I was also eliminating the amount of storage area I actually needed. So here are a few things I decided to get rid of:

  1. Dresser:  I use one shelf now and I hang up the rest of the items
  2. End Tables: I use two ottomans that have lids which I can flip over and use as mini portable coffee tables
  3. TV stand: My TV currently sits on a book shelf. I’m planning to use a projector that will be mounted to my wall to watch movies/TV (but that’s for the future)
  4. Filing cabinet: I digitized all of my documents and keep a small folder of the legal documents.
  5. Nightstand: I use my drafting table stool as my stand and I made a shelf to sit at the bottom of it, so I could at least place items down. I also created a pocket so that I could have a location to place my phone when it was attached to the charger as well.
  6. Bookshelf: I donated of one of my two bookshelves because I had digitized almost all of my books so I didn’t need the piece of furniture anymore.
  7. Futon: I donated my futon and replaced it with a couch 🙂 So it’s technically a replacement piece

I have:

  • 1 four level bookshelf
  • 1 couch with two ottomans
  • 1 bed
  • 1 drafting table, which I use as my desk
  • 1 hope chest, which I use as my seat at my desk
  • 1 “nightstand” (I use the chair from my drafting table set as my nightstand)
  • 1 dining table with 6 wood fold up chairs
  •  1 IKEA Poang Chair

I think getting rid of the dresser made the biggest impact because it wasn’t just the frame of the dresser or the drawers themselves, but it was also the amount of the contents stored within each drawer. There’s another article I read which might be of interest for those who want to read more about this: 15 Pieces of Furniture You May Not Really Need

It certainly helped me look at the use of furniture differently. Here’s my little nightstand contraption. I made the pocket from an old pair of jeans and I used pink shoelaces as ties for hanging the pocket. I used an old picture frame as a flat surface on this nightstand and attached it with some sticky velcro dots that were left over from another furniture set. I found a bag of pink shoelaces at my aunt’s house, she was going to throw it out, so I took it home. I keep all of my velcro straps because velcro is amazingly versatile and I keep extra metal rings and shoelaces  for projects like these.

dsc_3484