05.04.2020
0600
Materials:
- Warranties
- Receipts
- Important Documents
Tools:
- Calendar (preferably digital)
I like to organize important due dates in my life. This includes scheduling warranties, scheduling retail items that I purchase and might want to return, even scheduling the expiration date for my drivers license and passport. I tend to date a lot of my purchased items, because I just want to remember when I purchased the products. Also, most warranties will ask for the Date Of Purchase. But if there’s a warranty attached or some type of expiration date attached to the product, I will schedule it in my calendar. It’s basically a reminder for me to make a decision to take action or not. I actually keep a digital file on my hard drive, that has a folder assigned to every product that I’ve bought that came with an owners manual. Within each file, I save whatever information I need per product.
With balancing my work life and my home life, I utilize my digital calendar all of the time. Since I don’t buy too many products, scheduling warranties and items to return doesn’t really clutter up my calendar. However, if I don’t schedule those dates out, I will forget them.
WARRANTIES
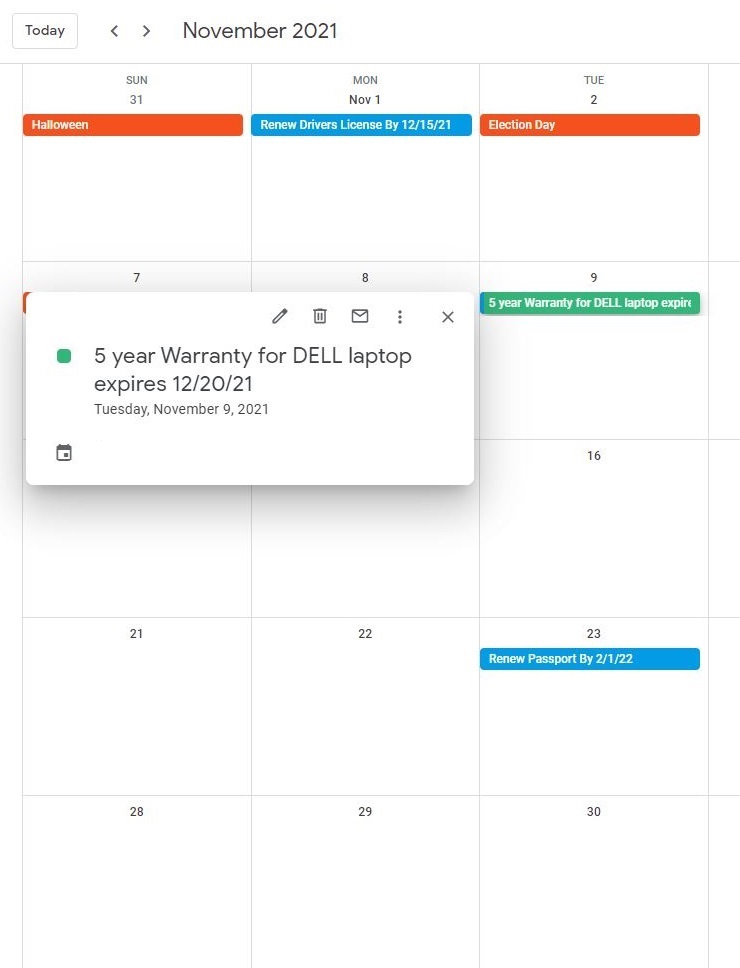
When I buy any electronic retail product, or any product that I have to assemble, I will jot down the date of purchase on the warranty document that comes with the product (usually in pencil in case I don’t decide to keep it), and then take a photo of it. This photo will be filed away in the digital folder assigned to the product, along with all of the other photos of this specific product.

I’ll then take a picture of the UPC number, the serial number (there’s usually a plaque or label on the product that describes all of the products details), and the receipt\invoice of the product. Once I decide that I’m going to keep the product, I’ll sign up for the warranty. I then set up the expiration date of the warranty in my digital calendar. I use a Google calendar to organize my life, but most digital calendars will help you do this as well.
I’ll usually gather the following pieces of information, and save it in a digital folder for my own record. I might also record all of this information on the expiration date in my digital calendar.
- Date of purchase
- UPC number
- Serial Number
- Brand and Model number
- Receipt/Invoice

RECEIPTS AND INVOICES
For the non electronic products that I purchase, I will keep the receipt, and I will schedule the maximum date possible to return the product. Sometimes, if I don’t have an immediate time slot to return the product, I will find a time in my busy schedule to return the item. I will keep the receipt with the products, and then schedule the maximum return date on the receipt in my digital calendar.
For retail products receipts, I will write down in my calendar:
- Time frame to return product
- Date of purchase
- Receipt/Invoice

BILLS
When it comes to bills, I always schedule those out as well. For each bill I assume that the amount will be similar to the month of the previous year, give or take $50 based on the current year’s circumstances. If you can guesstimate how much money you’ll need every month for bills, you’ll likely know how much money you’ll have available to spend on other stuff.
If you’re looking to switch service companies, or maybe switching a service provider, I would definitely schedule out a date to do that. This way, you as a consumer, can search for and receive the best deals. For instance if your cell phone bill is due on the fourth of every month, and you know that the best deals show up on the first of every month, schedule about two weeks prior to the first of the month to search for deals. That way by the time you decide to either upgrade your phone, or switch carriers, you’ll have all your information ready by the due date of the bill.
For bills, I’ll keep an eye out for monthly promotions or deals. I’ll schedule time out to talk to a representative (on my calendar), and then switch carriers.
- Utilities: Look into switching carriers and look for deals
- Mortgage: Save enough money by the due date

CREDIT CARDS
For credit card bills, my rule is to be able to pay off your credit card in a timely manner. Always have the amount in your checking account that you need to pay off your credit card each month. If you have to make payments, that’s fine too, but as long as you know that you have the money set, and ready to pay off the credit card.
- Credit Cards:
- Update all accounts tied to each credit card
- Make sure you’re able to pay off the credit cards


LEGAL DOCUMENTS
When it comes to more important documents in our lives such as a drivers license or passports, I will always schedule these expiration dates.
To renew most drivers licenses, there’s always a process to go through. If you can schedule out this process ahead of time, you save yourself from wasted time and a headache.
For passports, it’s the same process. I will schedule out my expiration date for my passport, but I set a reminder about four months prior to the expiration date. I do this because, to renew your passport takes a bit of time. Sending the passport off to be renewed, and then receiving it again takes 6-8 weeks.
- Drivers license: Make an appointment, gather all necessary documents, study, pay fees
- Passport: Gather all documents together, pay fees, allocate enough time to send off and receive before traveling
MEMBERSHIPS
I’ve also scheduled out my membership dues and fees for my life. Some memberships I decide to decline continuing, and some I decide to renew. It’s really dependent on what my goals are, and how much extra time I have to dedicate to those memberships. I just don’t want my memberships to expire unexpectedly.
- Memberships: renew annually as necessary
I like to keep track of my warranties in case my products break down or a product problem arises. Each time I buy a new product, I will always go through all of the paperwork and pamphlets to find PDF versions of them online. I will create a digital file of each product and jot down the Date OF Purchase. This does take a little bit of extra work, but I prefer to keep digital copies of everything. I organize all of my digital files by purchase date in the form of “year-month-date”. I’ll still download digital PDF pamphlets of the products I’m not sure I’ll keep. I do this because I’d rather get the work done initially, right when I purchase the product, than waiting to do it later.
But then I do schedule all of my warranties and items I plan to return.
Scheduling those dates as well as bills, credit cards, legal documents and membership expiration dates, helps keep my life more organized. I love utilizing my digital calendar and honestly, it makes my life so much easier to maintain.


