How I Keep Long Cords Organized

01.02.2018

0600

Materials:

  • Velcro straps
  • Cardboard

Tools:

  • Cables
  • Rope
  • Christmas Lights

Organizing long ropes is always a bit tricky. There are many different methods and techniques that people use in different professions. I discovered a few that help me keep different types of cords organized.

Every cable has a natural coil. When you try to fight that coil, bad things happen. The cable eventually twists on the inside, and when you needed it the most, the cable will fail.

DSC_7373

For long extension cords:

For extension cords, I use the “Over-Under Technique” to keep my longer cords in a loop form but also to keep it from twisting was I’m wrapping it up. This method eliminates unnecessary twists in the cord and allows the cord to coil in it’s natural state (like it was wrapped from the factory). You can check out how this technique is used at Digital Photo: “Studio Safety: Coiling Cables”. The technique looks like this:

Digital Studio- Studio Safety: Coiling Cables

Basically, you take the cable at one, holding the cable in one hand with your thumb holding that end down. With your other hand, and your thumb facing the same direction as your other hand, bring the cable around to create a loop and let that loop sit in your holding hand.

Then create another loop but face your thumb away from the holding hand’s thumb, bring it around to create another loop, but when it reaches your holding hand, make sure your thumb is facing the opposite direction of the holding hand’s thumb. Repeat these two types of loops until you finish with the entire cable. When you coil your cables in this sequence, the cable does not twist while you coil it up.

If you need to use the cable, you can grab the end of the rope that is on the outside,  throwing the coil away from your or just pulling on one end, and the rest of the cable will unravel quickly.

DSC_7357

For shorter cables, I wrap the cable around my hand, using the space between my thumb and index finger.

With Christmas lights, I take a piece of cardboard and I cut it into an “I” shape, with small slits cut into the four inside corners of the cardboard piece. These slits are about half an inch and marked where the red lines are located in the picture. If you want to know the measurements for my cardboard holders, I included it in the image below.

DSC_7359-3DSC_7359-2

Tuck the female end of the christmas lights into one of the slits. Continue wrapping the cord around the middle piece of the cardboard until the entire cord is wrapped. Then take the male end of the cardboard and tuck it into the nearest available slit.

When you need to use the Christmas lights, simply plug in the male end of the cord and unravel while decorating your tree, or just decorating inside as needed.

I also label each cord using masking tape, with that type of light it is (marked with the yellow circle) so it’s easier to identify each year when we set up the Christmas decorations. I also write the length of each cord on both the male end and female end, which is identified with the orange circle.

  • White Solid = White lights that don’t blink
  • White Blink = White blinking lights
  • Color Solid = Color lights that don’t blink
  • Color Blink = Color lights that blink


DSC_7361DSC_7363

DSC_7371-2

So these methods are how I keep my long cords organized and I’m sure there are more techniques as well. Hopefully these ideas will spark some new ways of how you can organize your cords.


How To Daisy Chain Your Long Ropes

12.26.2017

0600

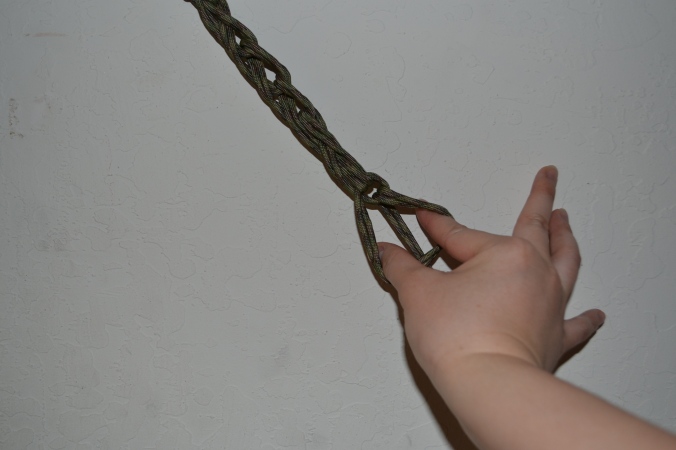
Storing long ropes can be a hassle, but if you know how to organize the ropes, unraveling them each time won’t seem as daunting. I like to wrap my long ropes in a daisy chain so that when I open the rope, it’s a quick process and it doesn’t get tangled.

A daisy chain is a simple method to store long ropes. It’s also known as a chain sinnet. It’s a method of shortening a rope or other cable while in use or for storage. It is formed by making a series of simple crochet-like stitches in the line. It can also reduce tangling while a rope is being washed in a washing machine. Rock climbers, concert stage workers have used this method in their professions. I’ve found that wrapping the ropes up in a daisy chain can be just as quick as unraveling it once you nail the method down.

DSC_7380

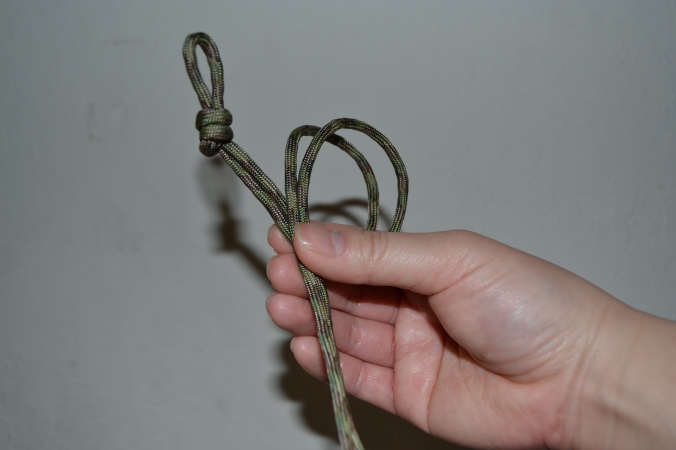
First find the middle of the rope and tie a knot to mark the middle point. It’s easier to create a loop while making the knot to make it more distinguishable.

DSC_7381

At the ends of the rope, tie knots to keep the rope from fraying.

DSC_7383

Before starting the chain pattern, it’s easier to step on the two loose ends of the rope so that the chain is taught when you’re creating it.  Take the end with the middle knot and loop the other end over it creating a loose loop.

DSC_8301

Then bring the rope through the loop you just created.

DSC_8303DSC_8304DSC_8305

Pull the new loop through the opening and bring it downwards so that you can see the hanging rope through the new loop.

DSC_8307

Grab the rope through the new loop and bring it through, towards yourself.

DSC_8308

Once you grab hold of the rope, bring down the chain so that the loop pattern is more taught. Once the pattern is tighter, you can bring the chain back up and repeat the process. DSC_8310DSC_8311DSC_8312DSC_8313

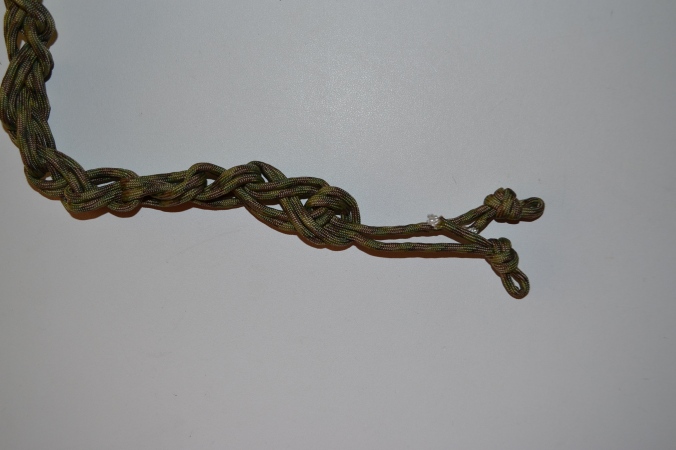
Once you get towards the end of the rope, just grab the leftover rope and pull it through. Make sure the ends of the rope won’t slip through the opening by tightening the last loop.

DSC_8320DSC_8323

DSC_8326

When you need to use this rope, simply open this end of the daisy chain, give it a little tug and your rope will unfold quickly and easily. I’m sure there are other methods of storing long rope, but this is my favorite way of storing my own. I usually use these ropes in my Sport Emergency Kit, so it comes in handy when I’m in the snow. This method also allows for a quick unravel for my gloved hands.

I hope this blog post helps you store your long ropes if you choose the Daisy Chain Method.


Know Your Knots

02.22.2016

0845

Materials:

  • Rope

Tools:

  • Pole to test out knots on

As someone who loves to keep extra rope and twine around, it makes sense that I made it a point to learn how to tie knots. But in addition to that, is that I actually carry a 100 foot parachord (Parachute cord) in my snowboarding backpack when I go up to the mountains. If you understand how to tie certain knots in certain situations, that knowledge can help you survive a situation, or help you while working over heights or water. Just knowing how to tie a few knots can still help you in many situations. Here are some knots that might be helpful:

  1. Reef Knot- This knot is a binding knot for connecting two lines together or a line around an object. It’s simple and effective and it is also known as a square knot.
    1. 01- Square Knot
  2. Clove Hitch- This knot can secure a line to a tree or post quickly, but it needs an anchor or it will slip.
    1. 02- Clove Hitch
  3. Bowline- This knot can create a nonadjustable loop at the end of the line, so the shape stays fixed.
    1. 03- Bowline
  4. Figure 8- This knot creates a stopping knot at the end of a line. This prevents the rope from unraveling and can also keep the rope from slipping past another rope.
    1. 04- Figure 8
  5. Sheet Bend- This technique can tie two different types of rope material together. This knot allows the joining of different thicknesses of rope as well.
    1. 05- Sheet Bend
  6. Two Half Hitches- This knot allows a line to be secured to trees or poles
    1. 06- Two Half Hitches
  7. Taut Line Hitch- This is an adjustable loop knot that will grip as long as there is tension on the “taut” side of the loop. Tension is maintained by sliding the hitch to adjust size of the loop. It can be used to secure tent lines or securing loads on vehicles.
    1. 07- Taut Line Hitch
  8. Improved Clinch Knot- This knot is used to secure a fishing line to a fishing lure or an artificial fly.
    1. 08- Fisherman's Knot
  9. Water Knot- This knot secures webbing, belts and straps together
    1. 09- Water Knot
  10. Rolling Hitch- A rolling hitch is used to attach a rope to a rod, pole or another rope.  It is used for lengthwise pull along an object rather than at right angles. The rolling hitch is designed to resist lengthwise movement for only a single direction of pull.
    1. 10- Rolling Hitch
  11. Prusik Knot- This knot is a friction hitch and it is used to put a loop of cord around a rope. It is used in climbing, mountaineering and rope rescue.
    1. 11- Prusik Knot
  12. Timber Hitch- This hitch will secure a rope around a cylindrical object. It is secure as long as tension is maintained but can be easily untied even after hauling a heavy load of weight.
    1. 12- Timber Hitch
  13. Blood Knot- This knot is used in fishing to secure two lines together. It will join sections of nylon line, while maintaining a high portion of the line’s inherent strength.
    1. 13- Blood Knot
  14. Artillery Loop- This knot creates a loop on the bight (the slack part between two ends of a rope). As long as the artillery loop is loaded, it will not slip and contract.
    1. 14- Man Harness
  15.  Carrick Bend- This knot is used to join two lines together. It can be used for heavy rope or cable that is too stiff to bend into other hitches.
    1. 15- Carrick Bend

If you keep in mind a few of these knots, they may very well help you in dire situations. It is a simple skill to know these knots by heart, but it can be one of the most useful as well. I always use ropes for a number of projects and situations and I have learned that the physics that go into tying a knot is so self sustainable, that I don’t have to worry about much else.