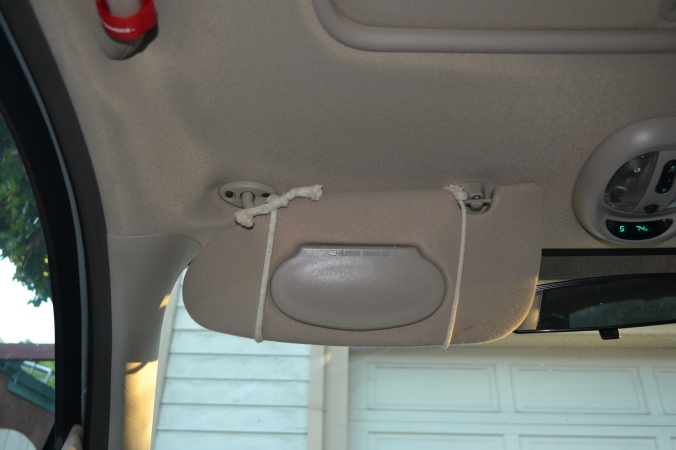
Car Hack For Cell Phone Calls

09.19.2017

0600

Materials:

  • Cotton Rope

Tools:

  • Know your knots
  • Scissors

This is a very simple hack and I use it when I put my phone calls on speaker mode. I simply tied two ropes around my car visor where it was tight enough to carry the weight of my cell phone. The ropes still don’t interfere with my visor mirror use as well.

The rope loop on the left side of my visor was tied as it was placed on my visor, then tied off. The rope loop on the right side was actually measured by gauging how much rope I needed to wrap around the visor and then I tied a knot to close off that piece.  I slid it over the visor and because it was a tight squeeze, I knew the knot would naturally tighten more as I was trying to stretch the rope accordingly. I wanted this lop to be tight because it would carry more weight compared to the other one.

The right rope loops is tight enough to hold my cell phone in place in a vertical position. Sometimes I’ll write down my directions if I know I’m going somewhere, where I know I won’t get good reception and place the paper behind the left rope loop. These are good for lists too (ie. grocery lists, errand stop offs, to-do lists, etc).

If I’m driving long distances and I need to swing my visor out to block out the sun from the driver’s side window, I’ll usually slide the phone in on the other side of the visor. It will still hold it in place and technically, the microphone will be even closer to hear and speak into. If you do use this method, just remember to not swing the visor too aggressively. If you do need to use your visor for a short time, keep in mind which side of the visor your phone is on.

So there you have it, my very simple car hack for cell phone speaker mode.

Please don’t text while driving.

DSC_6497


DSC_6495DSC_6504

Backpack Hacks

08.15.2017

0600

With all of my backpacks that I have ever owned, I hack them the exact same way as I always have. Going back as far as middle school, I always had to hack my backpacks. It was my way of customizing my carrier to my exact needs and over time I would edit it as my needs changed. Within each compartment I always created some type of hanging or attachment mechanism to hang my water bottles, extra bags within the compartments or hang something I needed access to immediately. most of the time I hung items that I needed access to so that those items weren’t at the bottom of my bag, where I had to go digging around to look for them.

Front of the backpack

  • I always attach extra reflectors so that in low light, vehicles or any type of light can bounce off of my backpack and I can be visible. These reflecting straps are for bikers, but I took two of the straps and weaved them through my exisitng strap set up.
DSC_4842
  • For all of my zippers that open to significant compartments, I always sew a section of the zipper, so it limits the access to that compartment to only one direction of movement for the zipper. I prefer to only have access in one direction for the zipper movement so it’s easier to watch over and maintain. I also attach metal rings right below the point of the sewing block (through the exposed zipper tape) so that I can use this ring to lock my carabiners from the outside but to also hang items on the inside of the bag.
DSC_6510
DSC_6526
  • On the inside, I hook extra interior metal rings with carabiners to the exterior rings that are popping through the tape so I can hang items on the inside. I’ll hang my water bottle from these interior rings (when my external water bottle pocket has my coffee tumbler in it) or small bags so I can keep items separated in the same compartment. These interior rings are there for anything that needs to be hanged or utilized.
00-eas.260.2007_010_01
DSC_6511
DSC_6513

Sides of the backpack

  • I also sew blocking for my smaller compartments and create a locking system for these pockets as well. For the smaller pockets, it really just depends how and where you want to secure the pocket. I chose to insert an extra ring so that I could attach an extra carabiner to it and lock the zipper with it.
DSC_6533
DSC_6534
  • For my external water bottle pocket, I usually take one of the extra backpack straps (that I trimmed off)  to create a safety strap for the external water bottle pocket so that it can hold taller water bottles more securely. There have been a few incidents where my external water  bottle pocket wasn’t deep enough and due to the fact that I had so much stuff in my backpack, my water bottle managed to get squeezed out of the pocket.
DSC_6518

Back of the backpack

  • I usually trim the extra strap slack that comes with the backpack straps. I don’t like any loose hanging straps so I will measure how high I want to carry my backpack and trip, then hem the straps accordingly.
  • For my backpack straps, I like to keep my smaller items very close to me. So I will attach some type of pocket (large enough to fit my “wallet” items and my cell phone) to the front. This backpack didn’t come with a pocket for those types of intimate items.
DSC_6538
DSC_6537
DSC_6540
  • I also ALWAYS, ALWAYS attach an extra carabiner to the other strap, so I can hook my keys onto my strap quickly.
DSC_6531 - Copy.JPG

So there you have it, those are the hacks I made for this backpack. This is my day to day back pack, so I’ll run to the store or go hiking with it. I do have another hiking backpack that’s a 65 gallon capacity for traveling and I’ve hacked that accordingly as well. Hopefully you may see a hack i described here that you would like to use on your own backpacks or carrying bags that you may want to use.

Needed A Phone Holder For The Car

02.15.2016

0800

Materials:

  • Shoelace
  • Carabiner
  • Metal rings
  • Box that would fit my cell phone
  • Electrical tape (try to match the same color as the new cell phone holder)

So I made this phone holder in 2011, it was right around the time when the statistic of distracted driving started becoming an issue. Quite frankly, I don’t text and drive, I enjoy driving when I’m driving. The idea of getting pulled over for a ticket is also not one of my goals. However, I still used my GPS map when I drove to new locations. I did research different types of phone holders for cars and I wasn’t happy with any of the designs.

I like to keep surfaces clean, mostly because I hate to move things when I wipe down a surface, and then move them back. The mounting units that came with the phone holders would either have a set holder that would attach to surfaces or they were movable. There was the option of using the devices that had a suction cup to stay attached to my windshield, but if my windshield temperature got too cold, it would slowly release the suction and the entire device would fall down.

I love the Law of Gravity. I really do. I utilize it in almost everything I design or make. This was my solution to my problem.

DSC_3514DSC_3515DSC_3516

I used the black case that my 1 TB external hard drive, and used rings to hang the case from my vent system in my car. I cut a rectangular hole on the bottom so that I could attach the charging cord. I cut out a rectangular hole so that I could see the screen when I drove and I used electrical tape to clean the edges. (I use electrical tape when the environment calls for some sort of heat fluctuation.) The holder is slightly bigger than the phone, but I figured, iPhones are getting larger with each generation so why not.

I have an old car but I still love looking at this contraption. It’s just amusing to see my solutions. It’s not the prettiest iPhone holder, nor do I think it would sell, but I didn’t go out any buy anything and it still works to this day.